Ensuring Print Accuracy, Structural Stability, and Clean Installation
In professional print production, the success of a project often depends not only on design quality but on precise and experienced prepress preparation. This project is a strong example of how advanced prepress work transforms a technically demanding Adobe Illustrator file into a fully production-ready window sticker designed for transparent foil and real-world installation conditions.
Project Overview: Transparent Foil with White Backprint
The assignment involved preparing artwork for a transparent window foil that required both CMYK printing and white backprinting, combined with a technically accurate cut line. The client supplied a visually complete but structurally complex Illustrator file built entirely from vector elements, including compound paths, nested objects, and defined patterns. Although the design appeared correct on screen, it was not suitable for specialty printing without extensive prepress restructuring.
The artwork was intended for application on a window, which meant that color visibility depended entirely on proper white underprinting. A dark blue background was used only for visualization purposes to simulate the window surface and evaluate contrast. The final production files themselves contained no background color and were prepared with fully transparent backgrounds.

Converting Patterns into Editable Vector Elements
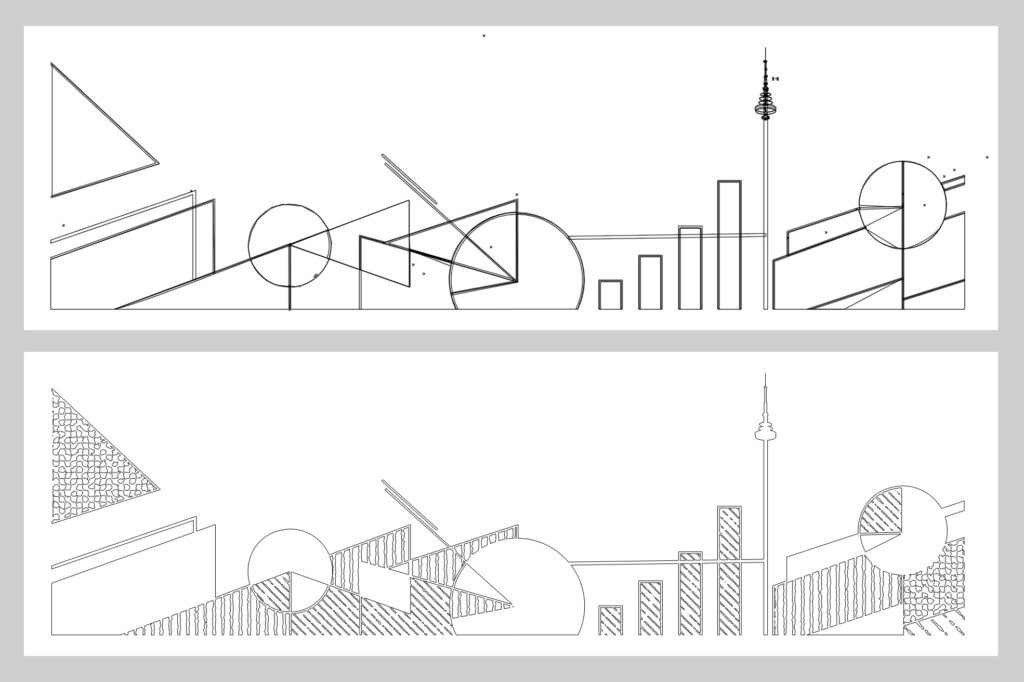
A major technical obstacle was the use of Illustrator pattern definitions embedded within container objects. While these patterns were visually correct, they prevented proper color separation and made it impossible to extract clean white backprint shapes. As part of the prepress process, all defined patterns were converted into real vector elements.
These vectors were rebuilt and clipped in a way that preserved the original visual appearance while allowing red and white components to be separated into different print pages. This step is a typical example of advanced prepress work, where visual fidelity must be maintained while fundamentally changing the internal structure of the file to make it production-safe.
As part of this process, the file was also thoroughly cleaned up at object level. Stray anchor points, unnecessary line segments, and redundant paths were removed, and overlapping or fragmented shapes were merged wherever possible. This significantly reduced the overall number of objects in the file, resulting in cleaner vector geometry, improved performance during printing and cutting, and a more reliable and predictable production workflow.
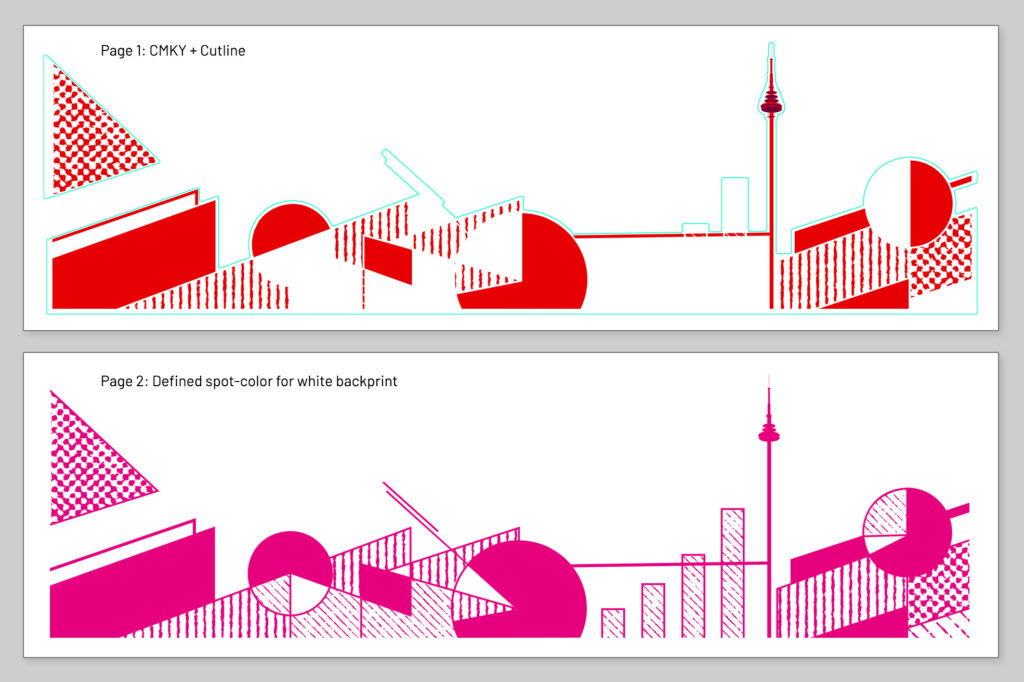
Splitting Artwork into Two Print Pages
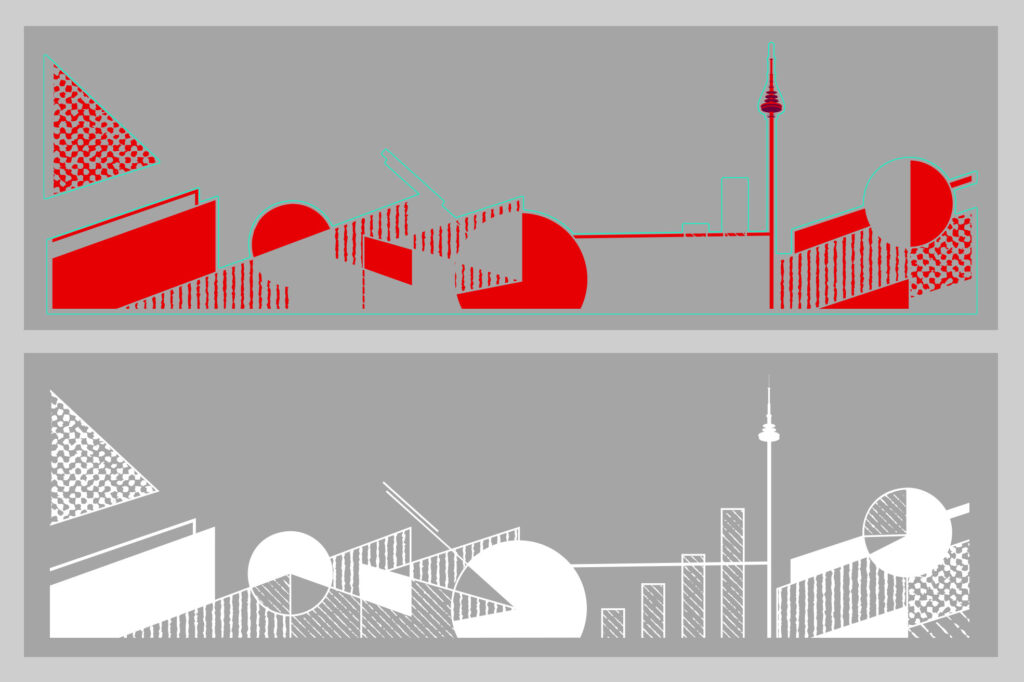
Because the foil was transparent, all red printed areas required a perfectly aligned white underlayer. To ensure correct print sequencing and registration, the artwork had to be divided into two separate print pages. One page contained the CMYK print elements, in this case only red, together with the technical cut line. The second page contained only the white backprint elements.
This separation could not be achieved through simple color duplication. Each element had to be carefully isolated and structurally prepared so that red and white areas matched precisely while remaining technically independent for printing.
Designing a Technically Correct Cut Line
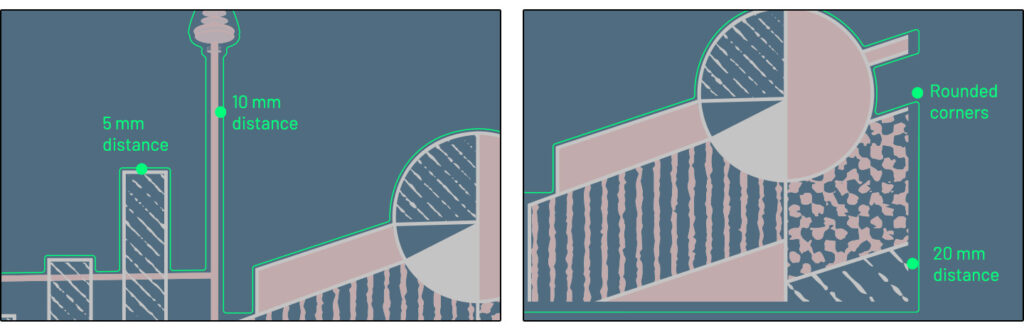
Another critical requirement of the project was the creation of a precise cut line that respected both installation needs and material behavior. The client specified that the cut contour had to be positioned twenty millimeters away from the printed elements on the left, right, and bottom edges. This distance was necessary to give the installer enough foil material to handle and cut the sticker safely.
Within the design, a minimum distance of five millimeters between elements was required to avoid weak points. However, in areas with thin vertical shapes, such as the tower, the cut line had to be positioned only ten millimeters away from the print to preserve structural strength and prevent the foil from tearing during handling or installation.
After the cut contour was defined, it was further refined during prepress by cleaning up the path and removing superfluous anchor points. The cut line was also finished with rounded corners, which improves plotter performance during cutting and reduces stress points on the foil, ensuring that the sticker is less likely to lift or become damaged during window cleaning and long-term use.
Because of these varying requirements, a simple offset path was not sufficient. The cut contour had to be manually constructed and adjusted around different parts of the artwork, balancing ease of cutting, visual consistency, and material stability.
Transparent Background and Real-World Visualization
Although the preview visuals show a dark blue background, this color was never part of the print data. It was used purely to simulate the appearance of the sticker once applied to a window. The final files contained only vector artwork, properly separated colors, defined spot colors for white backprint, and a clean technical cut line, all placed on a fully transparent background.
This approach ensures predictable print results and avoids unwanted background artifacts during production.
Conclusion: Prepress That Prevents Errors and Ensures Quality
By restructuring the artwork, converting patterns into usable vector elements, separating print layers correctly, and designing an intelligent cut line, this project was delivered in a form that was fully production-ready and installer-friendly. The result minimized risk, reduced the chance of production errors, and ensured a clean and durable final appearance on the window.
This is precisely the value of professional prepress work: bridging the gap between design and successful physical output while saving time, materials, and cost.